Insulate a garage door DIY is a project that can significantly improve your home’s energy efficiency and comfort. By adding insulation to your garage door, you can prevent heat loss in the winter and heat gain in the summer, leading to lower energy bills and a more comfortable living environment. Moreover, insulation can also reduce noise levels coming from the garage, creating a quieter and more peaceful home.
This guide will walk you through the entire process of insulating your garage door, from understanding the different types of insulation materials to the step-by-step installation process. We’ll cover essential tips and tricks to ensure a successful DIY project, along with safety considerations and cost-effective options.
Understanding Garage Door Insulation Needs
Insulating your garage door can significantly improve your home’s energy efficiency, comfort, and overall value. By adding insulation, you can create a more comfortable space, reduce energy bills, and even decrease noise levels.
Types of Garage Door Insulation Materials
The type of insulation you choose for your garage door will depend on your budget, the level of insulation you need, and your DIY skills. Here are some popular options:
- Foam Boards: These are rigid panels made from expanded polystyrene (EPS) or extruded polystyrene (XPS). They are easy to install and provide good insulation. Foam boards are typically available in various thicknesses and R-values.
- Fiberglass Batts: These are soft, flexible insulation materials made from fiberglass fibers. They are affordable and relatively easy to install, but they require a vapor barrier to prevent moisture damage. Fiberglass batts are typically available in different thicknesses and R-values.
- Spray Foam: This is a liquid insulation that expands and hardens to fill gaps and cavities. Spray foam is an excellent choice for sealing air leaks and providing a high R-value. However, it can be more expensive than other insulation materials.
Determining the R-Value Needed for Optimal Insulation
The R-value of insulation measures its resistance to heat flow. A higher R-value means better insulation. The R-value you need for your garage door will depend on your climate and how you use your garage.
For example, if you live in a cold climate and use your garage as a workshop, you will need a higher R-value than someone who lives in a warm climate and only uses their garage for storage.
Here are some general guidelines for determining the R-value needed for your garage door:
- Cold Climates: R-value of 19 or higher
- Moderate Climates: R-value of 13 to 16
- Warm Climates: R-value of 6 to 10
Preparing for Insulation Installation

Before you begin installing insulation in your garage door, you need to gather the necessary tools and materials and prepare the door for the installation process. This preparation will ensure a smooth and efficient installation process, resulting in a well-insulated garage door.
Tools and Materials
A well-equipped toolbox is essential for any DIY project, and insulating your garage door is no exception. Here’s a list of tools and materials you’ll need:
- Safety Glasses: Protecting your eyes from debris and dust is crucial. Wear safety glasses throughout the entire project.
- Work Gloves: Protect your hands from cuts and scrapes, especially when working with sharp tools or insulation materials.
- Measuring Tape: Accurate measurements are essential for determining the correct amount of insulation and ensuring a proper fit.
- Utility Knife: Use a utility knife for cutting insulation panels and trimming excess material.
- Level: Ensure that the insulation panels are installed straight and level for a professional look.
- Scissors: For cutting insulation panels, especially when working with flexible materials.
- Staple Gun: Secure the insulation panels to the garage door using a staple gun.
- Staples: Choose staples that are appropriate for the thickness of the insulation and the material of the garage door.
- Insulation Panels: Select insulation panels that are appropriate for the size and thickness of your garage door. Consider the R-value of the insulation to determine the level of insulation required for your climate.
- Vapor Barrier: Install a vapor barrier to prevent moisture from entering the garage door and damaging the insulation.
- Caulk: Seal any gaps or cracks between the insulation panels and the garage door to prevent air leaks and improve insulation efficiency.
- Trim: If desired, use trim to cover the edges of the insulation panels for a finished look.
Preparing the Garage Door
Before you begin installing insulation, it’s essential to prepare the garage door properly. This step will ensure a clean and smooth surface for installation.
- Clean the Garage Door: Remove any dirt, debris, or grime from the surface of the garage door using a brush, vacuum cleaner, or damp cloth. This will create a clean surface for the insulation panels.
- Remove Existing Trim or Panels: If your garage door has existing trim or panels, remove them to gain access to the door’s surface for insulation installation. Be careful not to damage the door while removing these components.
Measuring the Garage Door
Accurately measuring your garage door is crucial for determining the correct amount of insulation needed.
- Measure the Width and Height: Measure the width and height of the garage door using a measuring tape. Be sure to measure the entire surface, including any frames or tracks.
- Calculate the Area: Multiply the width by the height to calculate the total area of the garage door. This will help you determine the amount of insulation panels required.
- Consider Insulation Thickness: When calculating the amount of insulation needed, factor in the thickness of the insulation panels. Thicker insulation panels will require more material to cover the entire door surface.
Insulating the Garage Door

Now that you’ve gathered your materials and prepped your garage door, it’s time to tackle the actual insulation process. The method you choose will depend on your budget, the level of insulation you desire, and the type of garage door you have.
Installing Foam Boards
Foam boards are a popular choice for garage door insulation due to their ease of installation and affordability. They are available in various thicknesses, allowing you to customize the level of insulation.
Here’s how to install foam boards:
* Measure and cut: Measure the sections of your garage door that you want to insulate. Use a utility knife to cut the foam boards to size, ensuring they fit snugly within the panels.
* Attach the boards: Use construction adhesive to attach the foam boards to the inside of the garage door panels. Apply a bead of adhesive around the perimeter of the board and press it firmly into place.
* Secure with fasteners: To ensure a secure fit, use screws or nails to fasten the foam boards to the door panels. Use screws or nails that are long enough to penetrate the foam board and secure it to the underlying structure.
* Seal the gaps: After installing the foam boards, use a sealant like caulk or weatherstripping to seal any gaps or openings around the edges of the boards. This will prevent heat loss and air infiltration.
Important Considerations:
* Choose the right thickness: The thickness of the foam boards you choose will depend on your desired level of insulation. Thicker boards offer better insulation but may be more expensive.
* Safety precautions: When using a utility knife, always wear safety goggles and gloves to protect your eyes and hands.
* Proper ventilation: Ensure adequate ventilation within your garage to prevent moisture buildup, which can damage the foam boards.
Fitting Fiberglass Batts
Fiberglass batts are another common option for garage door insulation. They are flexible and easy to work with, making them suitable for irregular shapes and hard-to-reach areas.
Here’s how to install fiberglass batts:
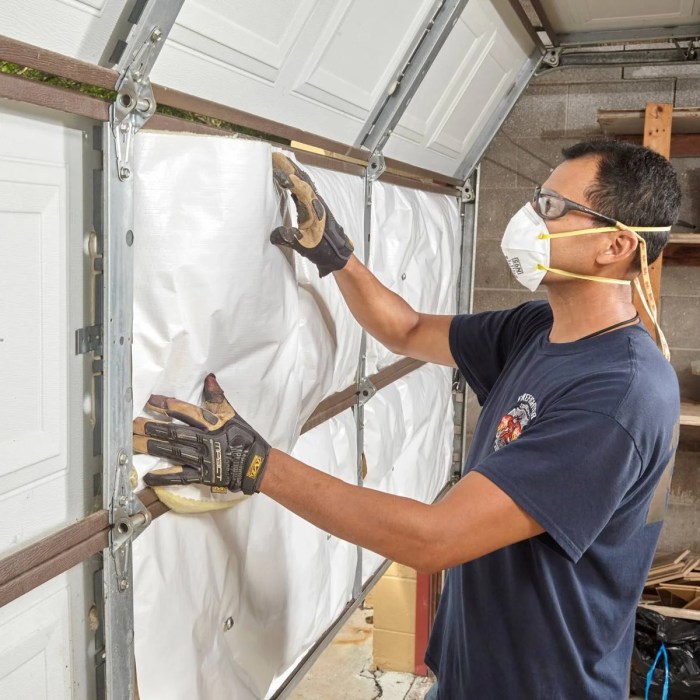
* Prepare the door: If you’re installing fiberglass batts in a sectional garage door, you’ll need to remove the panels. This will give you easier access to the inside of the door.
* Cut the batts: Measure the space inside each panel and cut the fiberglass batts to size. Use a utility knife or a pair of scissors to make clean cuts.
* Secure the batts: Use staples or adhesive to secure the fiberglass batts to the inside of the door panels. Make sure the batts are snugly fitted and there are no gaps.
* Reinstall the panels: Once the fiberglass batts are installed, reassemble the garage door panels.
* Seal the gaps: Use a sealant to seal any gaps or openings around the edges of the fiberglass batts.
Important Considerations:
* Safety precautions: When working with fiberglass batts, always wear a mask and gloves to protect your skin and lungs from the fibers.
* Ventilation: Ensure proper ventilation during and after installation to prevent moisture buildup.
Applying Spray Foam
Spray foam insulation offers a high level of insulation and creates a seamless barrier against air infiltration. However, it requires specialized equipment and can be more expensive than other methods.
Here’s how to apply spray foam insulation:
* Prepare the door: Clean the surface of the garage door panels to remove any dirt or debris.
* Apply the foam: Use a spray foam gun to apply the foam to the inside of the door panels. Follow the manufacturer’s instructions for application and curing time.
* Allow the foam to cure: Once the foam is applied, allow it to cure completely before installing any trim or finishing materials.
* Trim excess foam: After the foam has cured, trim any excess foam using a utility knife.
Important Considerations:
* Professional help: If you’re not comfortable using spray foam insulation, consider hiring a professional contractor.
* Safety precautions: Always wear a respirator and gloves when working with spray foam.
* Ventilation: Ensure proper ventilation during and after application.
Alternative Insulation Methods
If you’re looking for alternative insulation methods for your garage door, there are a couple of options to consider, each with its own advantages and disadvantages. These methods offer different levels of insulation and cost-effectiveness, allowing you to choose the best option for your needs and budget.
Reflective Insulation
Reflective insulation works by reflecting radiant heat back to its source. It typically consists of a thin layer of material, often aluminum foil or a similar reflective surface, that is placed behind the garage door. This method is particularly effective in reducing heat transfer during the summer months, as it helps to keep the garage cooler.
Advantages
- Easy to install: Reflective insulation is often available in pre-cut sheets or rolls, making it relatively simple to install.
- Lightweight: Reflective insulation is lightweight, making it easier to handle and install, especially on larger garage doors.
- Cost-effective: Reflective insulation is typically more affordable than other insulation methods.
Disadvantages
- Limited insulation value: Reflective insulation is not as effective at insulating against cold temperatures as other methods, such as foam board or fiberglass insulation.
- Susceptible to damage: Reflective insulation can be easily damaged, especially if it is exposed to sharp objects or rough handling.
Examples
- Radiant Barrier: This type of reflective insulation is often used in attics and crawl spaces. It typically consists of a thin layer of aluminum foil that is attached to a paper or plastic backing.
- Reflective Foil Tape: This tape can be used to seal gaps and seams in your garage door, preventing heat from escaping or entering.
Garage Door Blanket
A garage door blanket is a thick, insulated cover that is placed over the entire garage door. These blankets are typically made from materials such as fiberglass, foam, or a combination of both. They are designed to provide a significant level of insulation, reducing heat loss in the winter and heat gain in the summer.
Advantages
- High insulation value: Garage door blankets provide a significant level of insulation, making them effective in both summer and winter.
- Easy to install: Most garage door blankets are easy to install, simply attaching them to the door with straps or hooks.
- Versatile: Garage door blankets can be used on both single and double garage doors.
Disadvantages
- Bulkier: Garage door blankets can be bulky and may make it difficult to open and close the garage door.
- Higher cost: Garage door blankets are typically more expensive than reflective insulation.
- Limited durability: Garage door blankets can be susceptible to damage from weather and wear and tear.
Examples
- Insulated Garage Door Blanket: These blankets are typically made from a combination of fiberglass and foam insulation, providing a high level of thermal resistance.
- Heavy-Duty Garage Door Blanket: These blankets are designed for extreme weather conditions and often feature thicker insulation and a more durable outer layer.
Cost and Budget Considerations: Insulate A Garage Door Diy
Insulating your garage door can be a cost-effective way to improve energy efficiency and comfort in your home. The overall cost of the project will depend on the size of your garage door, the type of insulation you choose, and whether you hire a professional or do it yourself.
Estimating Insulation Costs
The cost of insulation materials will vary depending on the type and thickness you choose. Here’s a general breakdown of common insulation options and their estimated costs:
- Fiberglass batts: Fiberglass batts are a popular and affordable option. They typically cost between $10 and $20 per roll, which can cover about 15 square feet. You’ll also need to factor in the cost of vapor barrier, which can range from $5 to $10 per roll.
- Spray foam insulation: Spray foam insulation is more expensive than fiberglass batts, but it offers superior insulation and air sealing. The cost of spray foam insulation can range from $1 to $3 per square foot, depending on the type and thickness.
- Rigid foam insulation: Rigid foam insulation boards are another popular option. They are typically more expensive than fiberglass batts, but they offer better insulation and are more durable. The cost of rigid foam insulation can range from $20 to $50 per sheet, depending on the thickness and type.
Cost of Tools and Materials
In addition to insulation materials, you’ll also need to purchase some tools and materials for the installation. These can include:
- Measuring tape: Measure the size of your garage door to determine the amount of insulation needed.
- Utility knife: Cut the insulation to size.
- Staple gun: Secure the insulation to the door frame.
- Safety glasses: Protect your eyes from debris.
- Gloves: Protect your hands from fiberglass insulation.
Saving Money on Insulation
There are several ways to save money on your garage door insulation project:
- Buy materials in bulk: If you’re insulating multiple doors, buying materials in bulk can save you money.
- Choose less expensive insulation options: Fiberglass batts are a more affordable option than spray foam or rigid foam insulation.
- Do it yourself: Installing garage door insulation is a relatively simple DIY project. You can save money by doing it yourself instead of hiring a professional.
Environmental Impact
Insulating your garage door not only improves energy efficiency but also has positive environmental implications. Choosing the right insulation material can significantly reduce your carbon footprint and contribute to a greener future.
Eco-Friendly Insulation Options
Selecting eco-friendly insulation options for your garage door can make a substantial difference in your home’s environmental impact. Here are some sustainable insulation choices:
- Recycled Materials: Insulation made from recycled materials, such as denim, fiberglass, or plastic bottles, minimizes waste and reduces the demand for virgin resources.
- Plant-Based Insulation: Insulation derived from natural materials like cellulose, cork, or hemp is biodegradable and renewable, making it a more sustainable option compared to synthetic materials.
- Sustainable Manufacturing Practices: Look for insulation products manufactured with sustainable practices, such as using renewable energy sources, minimizing waste generation, and adhering to strict environmental regulations.
Reducing Energy Consumption and Greenhouse Gas Emissions
Insulating your garage door can play a significant role in reducing your home’s energy consumption and greenhouse gas emissions. By preventing heat loss in the winter and heat gain in the summer, you can minimize the need for heating and cooling, thereby reducing your reliance on fossil fuels.
A well-insulated garage door can contribute to a 10-15% reduction in your home’s energy consumption, leading to a decrease in your carbon footprint.
DIY vs. Professional Installation

Deciding whether to insulate your garage door yourself or hire a professional depends on several factors. While DIY insulation offers cost savings and a sense of accomplishment, professional installation ensures a more efficient and potentially longer-lasting outcome. Let’s explore the advantages and disadvantages of each approach to help you make an informed decision.
Advantages and Disadvantages, Insulate a garage door diy
Understanding the pros and cons of each approach will help you determine the best course of action.
- DIY Insulation
- Advantages:
- Cost-effective: DIY insulation is significantly cheaper than hiring a professional.
- Sense of accomplishment: Completing the project yourself can be rewarding and fulfilling.
- Flexibility and control: You have complete control over the materials and installation process.
- Disadvantages:
- Time commitment: DIY insulation requires time and effort, especially for larger garage doors.
- Skill level: Installing insulation properly requires some technical skills and knowledge.
- Potential for errors: Improper installation can lead to reduced effectiveness and even damage to the garage door.
- Professional Installation
- Advantages:
- Expert knowledge: Professionals have the experience and expertise to install insulation efficiently and correctly.
- Guaranteed results: Professional installations typically come with a warranty or guarantee.
- Time-saving: Hiring a professional saves you time and effort, allowing you to focus on other tasks.
- Disadvantages:
- Higher cost: Professional installation is significantly more expensive than DIY.
- Limited control: You have less control over the materials and installation process.
- Availability: Finding a qualified professional may require some research and scheduling.
Factors Influencing the Decision
Several factors play a role in deciding whether to DIY or hire a professional.
- Time Constraints: If you have limited time or a busy schedule, hiring a professional might be a better option.
- Skill Level: If you’re comfortable with DIY projects and have some basic carpentry skills, you might consider insulating the garage door yourself. However, if you lack the necessary experience, it’s advisable to hire a professional.
- Budget: DIY insulation is significantly cheaper than hiring a professional. However, consider the potential costs of materials, tools, and the possibility of mistakes that could lead to additional expenses.
Finding a Reputable Professional
If you decide to hire a professional, it’s essential to find a reputable and qualified contractor.
- Ask for Recommendations: Seek recommendations from friends, family, or neighbors who have had their garage doors insulated.
- Check Online Reviews: Read online reviews on platforms like Yelp, Google My Business, or Angie’s List to get an idea of the contractor’s reputation and customer satisfaction.
- Verify Licensing and Insurance: Ensure the contractor is licensed and insured, providing proof of both. This protects you in case of accidents or damage during the installation process.
- Get Multiple Quotes: Obtain quotes from several contractors to compare pricing and services.
- Ask for References: Request references from previous clients to get insights into the contractor’s work quality and professionalism.
Insulating your garage door is a simple yet effective way to enhance your home’s energy efficiency and create a more comfortable living space. By following the steps Artikeld in this guide, you can successfully complete this DIY project and reap the benefits of a well-insulated garage. Remember to prioritize safety, use the right materials, and take your time to ensure a proper installation. With a little effort, you can enjoy a warmer, quieter, and more energy-efficient home for years to come.
Insulating your garage door can be a great way to improve energy efficiency and reduce noise levels. While you’re getting crafty, you might consider making a DIY costume for your next themed party – maybe even a Jesus DIY costume ! Once you’ve tackled those projects, you’ll be well on your way to a comfortable and stylish garage space.

