Lumion 12 blows the doors off architectural visualization! This isn’t your grandpappy’s rendering software; we’re talking seriously next-level realism and a workflow that’s smoother than butter. Get ready to explore a world of enhanced features, from mind-blowing lighting effects to intuitive material handling, all designed to make your designs shine. This guide will walk you through everything you need to know to master Lumion 12, from system requirements to advanced rendering techniques.
Whether you’re a seasoned pro or just starting out, this deep dive into Lumion 12 will equip you with the knowledge and skills to create stunning visualizations that will leave your clients speechless. We’ll cover everything from optimizing your system for peak performance to mastering the art of post-processing, ensuring your renders are as polished as possible. Let’s get started!
Lumion 12 System Requirements
Okay, so you’re ready to dive into Lumion 12, huh? Before you get started rendering those awesome visualizations, let’s make sure your system can handle it. Knowing your hardware’s capabilities is key to a smooth workflow and avoiding frustrating slowdowns. This section will break down the minimum and recommended specs, and explain how different components affect performance.
System Requirements for Lumion 12
Choosing the right hardware for Lumion 12 is crucial for a smooth and efficient rendering process. Below, we’ve Artikeld the minimum and recommended specifications, along with some notes to help you understand the impact of each component.
| Component | Minimum | Recommended | Notes |
|---|---|---|---|
| Operating System | Windows 10 64-bit (version 1909 or higher) | Windows 10 64-bit (version 2004 or higher) or Windows 11 64-bit | Lumion requires a 64-bit OS for optimal performance. Newer versions often have improved compatibility and performance optimizations. |
| Processor (CPU) | Intel Core i5-4460 or AMD FX-6300 | Intel Core i7-8700K or AMD Ryzen 7 2700X | A faster CPU with more cores significantly improves rendering times, especially for complex scenes. |
| Graphics Card (GPU) | NVIDIA GeForce GTX 960 or AMD Radeon R7 370 (4GB VRAM) | NVIDIA GeForce RTX 2060 or AMD Radeon RX 5700 (8GB VRAM or more) | The GPU is the workhorse for rendering. More VRAM and higher clock speeds translate directly to faster render times and better visual quality. Consider a card with dedicated ray tracing cores for enhanced realism. |
| RAM | 16 GB | 32 GB | More RAM allows Lumion to handle larger scenes and more complex materials without performance hiccups. Running out of RAM leads to significant slowdowns. |
| Storage | SSD recommended | Fast NVMe SSD recommended | An SSD drastically reduces load times and improves overall responsiveness. An NVMe SSD offers even faster speeds. |
| DirectX | DirectX 11 | DirectX 12 | DirectX 12 offers improved performance and features compared to DirectX 11. |
Impact of Hardware Components on Lumion 12 Performance
Each component plays a vital role in Lumion 12’s performance. A powerful CPU handles the scene’s calculations, a capable GPU renders the visuals, and sufficient RAM prevents bottlenecks. Let’s look at each one individually.A faster CPU, with more cores, directly impacts rendering speed. A six-core processor might be fine for smaller projects, but a high-core-count CPU is preferable for complex scenes with many objects and effects.
The CPU handles physics calculations and other background processes, so a strong CPU is essential for a smooth user experience.The GPU is the most critical component for rendering speed and visual quality. A GPU with more VRAM can handle higher-resolution renders and more complex materials. A more powerful GPU with higher clock speeds will render faster. Ray tracing capabilities are also a significant factor in achieving photorealistic results.RAM is essential to prevent bottlenecks.
Insufficient RAM forces Lumion to use slower storage, causing significant slowdowns. Having plenty of RAM ensures smooth operation, especially when working with large scenes and many materials.
Comparative Performance Analysis of Lumion 12 on Different System Configurations
Predicting exact performance numbers is tricky because it depends on the scene complexity. However, we can illustrate the general performance differences based on typical configurations.
| System Configuration | Rendering Time (Estimated) | Visual Quality | Notes |
|---|---|---|---|
| Minimum Specs | Long rendering times, potential slowdowns | Acceptable, but may lack detail | Suitable for smaller, less complex projects. |
| Recommended Specs | Significantly faster rendering times | High quality, good detail | Ideal for most projects, allowing for smooth workflow and high-quality renders. |
| High-End Specs (e.g., RTX 3080, Ryzen 9 5900X, 64GB RAM) | Very fast rendering times, even for large complex scenes | Exceptional quality, high detail | Suitable for demanding projects and very large scenes. Allows for real-time rendering and interactive exploration of the scene. |
New Features in Lumion 12
Lumion 12 boasts a significant upgrade in rendering capabilities and workflow efficiency compared to its predecessor. This release focuses on enhancing realism, streamlining the design process, and boosting overall performance. Several key features stand out, offering users a more intuitive and powerful rendering experience.
The new features in Lumion 12 significantly impact the rendering process and workflow, allowing for quicker iteration and more realistic visualizations. The improvements span various aspects, from material creation and lighting to the overall rendering speed and ease of use. While direct comparisons to competitor software’s specific features are difficult without delving into a detailed feature-by-feature analysis of each program, the general improvements in Lumion 12 are notable and place it competitively in the architectural visualization market.
Improved Real-Time Ray Tracing
Lumion 12 features a substantial improvement in its real-time ray tracing capabilities. This results in significantly more realistic reflections, refractions, and shadows, enhancing the overall visual fidelity of the rendered scenes. The improvements are particularly noticeable in scenes with complex geometries and reflective materials.
For example, previously challenging reflections in glass surfaces now render with much greater accuracy and detail, capturing fine environmental reflections that were previously blurred or missing. This increased accuracy significantly reduces the need for post-processing work and speeds up the design iteration process. The improved ray tracing in Lumion 12 compares favorably with similar features in other high-end rendering software, offering a balance between speed and quality that’s difficult to match.
Enhanced Material Editor
The material editor has undergone a significant overhaul. The improved interface makes creating and editing materials more intuitive, with better organization and access to a wider range of parameters. Users can now more easily fine-tune the appearance of materials, creating highly realistic and customized textures.
- More intuitive drag-and-drop functionality for applying materials.
- Expanded library of pre-made materials, including more realistic wood, stone, and fabric textures.
- Improved control over material parameters, such as roughness, glossiness, and transparency.
The enhanced material editor in Lumion 12 streamlines the material creation process. Previously, creating complex materials could be time-consuming; the new editor allows for quicker creation and modification, enabling faster experimentation and refinement of the project’s aesthetic. This surpasses the material editing capabilities of some competitors, offering a more intuitive workflow and more granular control.
Faster Rendering Speeds
Lumion 12 boasts significant improvements in rendering speed, particularly noticeable in larger and more complex scenes. This is achieved through optimized rendering algorithms and improved hardware utilization. The faster rendering times allow for quicker feedback and faster iteration of designs.
For instance, rendering a large architectural model with complex details that previously took several minutes now renders in a fraction of the time. This considerable speed increase significantly boosts productivity and allows designers to experiment with different design iterations more efficiently. While direct speed comparisons to competing software depend heavily on specific hardware and scene complexity, the improvements in Lumion 12’s rendering speed are noticeable and contribute to a more efficient workflow.
Improved Lighting and Atmosphere
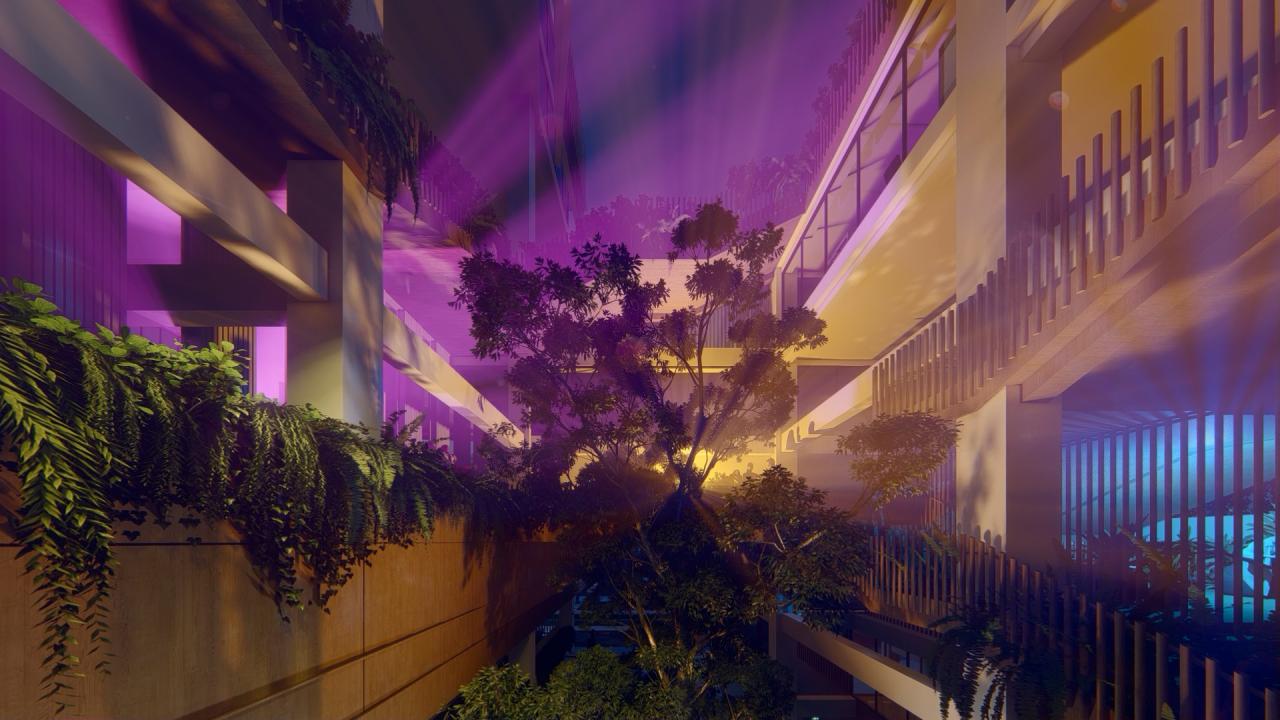
Lumion 12 introduces several enhancements to lighting and atmosphere creation. The improved lighting tools offer greater control over the intensity, color, and direction of light sources, allowing for more realistic and dramatic lighting scenarios. New atmospheric effects, such as volumetric fog and realistic sky conditions, further enhance the realism of rendered scenes.
For example, the new volumetric fog effects allow for the creation of more realistic and immersive environments, adding depth and atmosphere to scenes. The improved sky system allows for more accurate representation of different times of day and weather conditions. These features, combined with the improved lighting controls, provide users with greater creative control and allow them to create more impactful and realistic visualizations.
These lighting and atmospheric improvements place Lumion 12 competitively with other software in terms of realism and creative flexibility.
Lumion 12 Rendering Techniques
Lumion 12 offers a diverse range of rendering options, each catering to different project needs and priorities. Understanding these options and how to tweak their settings is key to achieving high-quality visualizations without sacrificing rendering time. This section breaks down the key rendering choices, highlighting their strengths and weaknesses, and provides a practical guide to optimizing your render settings for various project types.
Lumion 12’s rendering engine is built for speed and efficiency, but the quality of your final render is directly tied to the settings you choose. Balancing quality and speed is a constant juggling act, and this depends heavily on your hardware and the complexity of your scene. Different rendering modes in Lumion 12 trade off between speed, realism, and the types of effects that are possible.
Rendering Modes and Their Characteristics
Lumion 12 provides several rendering modes, each offering a unique balance between speed and visual fidelity. The primary modes are “Standard,” “High,” and “Ultra.” “Standard” prioritizes speed, suitable for quick previews or iterative design checks. “High” offers a good balance between speed and quality, making it a versatile option for many projects. “Ultra” prioritizes the highest quality, perfect for final presentations but at the cost of significantly longer rendering times.
Beyond these, there are also options for specific output types like still images, panoramas, and animations. The choice depends on your project goals. For example, a quick architectural walkthrough might benefit from “High,” while a detailed landscape visualization might require “Ultra” for optimal detail.
Optimizing Rendering Settings for Architectural Visualizations
Architectural visualizations often require a balance of photorealism and speed. For these projects, starting with the “High” rendering mode is often a good starting point. To further optimize:
First, assess your scene complexity. Highly detailed models with numerous materials and lights will naturally take longer to render. Consider simplifying models where appropriate, using proxies for distant objects, and optimizing material usage. Next, adjust the “Ray Tracing” settings. Higher ray tracing settings increase realism (especially reflections and shadows) but dramatically increase rendering time.
Experiment to find a sweet spot between realism and render time. For example, lowering the “Global Illumination” samples might speed up the render without significantly impacting the overall quality. Finally, experiment with anti-aliasing. Higher anti-aliasing settings reduce jagged edges but again, increase rendering time. For architectural visualizations, a medium setting is usually sufficient.
Optimizing Rendering Settings for Landscape Designs
Landscape designs often benefit from high-resolution renders to showcase intricate details of plants, water, and terrain. For these projects, the “Ultra” rendering mode might be necessary to capture the full richness of the scene.
However, even with “Ultra,” optimization is crucial. Begin by managing the level of detail (LOD) in your landscape. High-resolution textures and models for nearby objects are important, but distant elements can use lower-resolution versions to reduce the overall rendering load. Similarly, consider the number of light sources and shadows. While realistic shadows enhance the scene, excessive shadows can significantly impact rendering time.
Careful placement and optimization of light sources are key. Finally, post-processing effects can significantly enhance the final image, but overuse can increase render time. Balance the use of effects like bloom, depth of field, and color grading with the desired realism.
Impact of Rendering Settings on Image Quality and Rendering Time
The relationship between rendering settings, image quality, and rendering time is generally exponential. Small adjustments to settings like ray tracing samples or anti-aliasing can lead to disproportionately large changes in rendering time.
For instance, increasing the ray tracing samples from 16 to 32 might double or even triple the rendering time, while only yielding a relatively small improvement in visual quality. Similarly, increasing the anti-aliasing level from medium to high might increase rendering time by 50% with a less noticeable improvement in image quality. The optimal settings will always be a compromise based on your project’s specific requirements and available rendering time.
Lumion 12’s rendering capabilities are seriously impressive, but before you download any cracks or questionable files to get it, make sure your system’s clean. Grab a copy of malwarebytes free to scan for nasties; you don’t want a virus messing with your awesome Lumion 12 renders. Seriously, protecting your machine is way more important than saving a few bucks on software.
Experimentation and iterative adjustments are key to finding the sweet spot.
Lumion 12 Material Library
Lumion 12 boasts a significantly expanded material library compared to its predecessors, offering users a vast selection of pre-made materials to accelerate their workflow and enhance the realism of their renders. The library is meticulously organized for easy navigation and selection, making it simple to find the perfect material for any project, from realistic wood textures to highly stylized metallic finishes.
This extensive collection reduces the need for extensive external sourcing and allows for quick experimentation with different material properties.The material library’s organization is intuitive and user-friendly. Materials are categorized by type, allowing for efficient browsing and selection. The search function further streamlines the process, allowing users to quickly locate specific materials by name or . This efficient organization saves valuable time and effort, allowing users to focus on the creative aspects of their project.
Material Types Available in Lumion 12
The Lumion 12 material library contains a wide array of materials categorized to simplify selection. These categories are not mutually exclusive; some materials may fall under multiple classifications. For example, a “rough concrete” material could be categorized as both “concrete” and “rough.”
- Woods: A diverse selection ranging from smooth polished woods to rustic, weathered planks, including various species like oak, pine, and mahogany. Each wood type often features several variations in color and grain pattern.
- Metals: A comprehensive range of metals including steel, aluminum, copper, brass, and gold, with options for various finishes like brushed, polished, and rusted.
- Stones: A wide variety of natural and artificial stones such as marble, granite, slate, and concrete, each offering different textures and colors.
- Plastics: Materials simulating various plastics with different levels of gloss, translucency, and color.
- Paints: A collection of various paint finishes including matte, gloss, and metallic paints in a wide range of colors.
- Fabrics: A selection of fabrics like leather, cotton, silk, and wool, each with varying textures and patterns.
- Glass & Liquids: Transparent and translucent materials including various types of glass, water, and other liquids.
- Others: This category encompasses a broad range of materials that don’t neatly fit into the other categories, including things like earth, grass, snow, and various specialized surfaces.
Importing and Creating Custom Materials
Importing custom materials into Lumion 12 is a straightforward process, generally involving importing image files representing the material’s diffuse, normal, and roughness maps. These maps provide the visual information and surface properties to Lumion. The software supports various image formats, ensuring compatibility with most 3D modeling and texturing workflows. The exact steps may vary slightly depending on the file format and the version of Lumion, but the general principle remains consistent across different versions.
For example, a high-resolution image of a brick wall could be imported as a diffuse map, while a normal map could add depth and realism to the surface.Creating custom materials from scratch involves a more hands-on approach, typically requiring external image editing software to create the necessary texture maps. Users can then import these maps into Lumion, defining the material properties such as roughness, reflectivity, and transparency.
This allows for complete customization and the creation of unique materials not found in the pre-built library. This process is more advanced but allows for unparalleled creative control, enabling the creation of truly unique and realistic materials that perfectly suit the project’s aesthetic. For instance, one could create a custom material simulating a specific type of aged wood by meticulously crafting the diffuse, normal, and roughness maps in an external program like Photoshop.
Lumion 12 Lighting and Atmosphere Effects
Lumion 12 offers a robust suite of lighting and atmospheric tools that empower users to craft incredibly realistic and evocative renderings. Mastering these tools is key to elevating your visualizations from simple representations to compelling narratives. This section will explore the various lighting options and atmospheric effects available, demonstrating how to achieve specific lighting scenarios and the impact these have on the overall mood and realism of your projects.
Lumion 12 provides a diverse range of lighting tools, catering to various needs and skill levels. From simple adjustments to complex lighting setups, users can achieve a wide spectrum of lighting styles.
Sun and Sky Settings
Lumion 12’s built-in sun and sky system allows for precise control over the position, intensity, and color of the sun, creating realistic lighting for any time of day. Users can adjust the time of day, weather conditions (clear, cloudy, overcast, etc.), and even the geographical location to simulate realistic lighting based on real-world conditions. For instance, a midday sun in a clear sky will cast sharp shadows and produce bright, saturated colors, while an overcast day will yield soft, diffused lighting.
The system also allows for adjustments to the sun’s intensity and color temperature, giving users fine-grained control over the overall lighting ambiance.
Artificial Lighting Tools
Beyond natural light, Lumion 12 provides a variety of tools for creating and manipulating artificial light sources. These include photometric lights, offering precise control over intensity, color temperature, and beam spread, mimicking the behavior of real-world lighting fixtures. Area lights and point lights provide broader illumination, while spotlights can be used to highlight specific features. Users can experiment with different light colors and intensities to create dramatic or subtle lighting effects, depending on the desired mood.
For example, warm-toned lights can create a cozy atmosphere, while cool-toned lights can establish a more modern or clinical feel.
Realistic Lighting Scenarios
Achieving realistic lighting scenarios involves a combination of careful planning and utilizing Lumion 12’s tools. For a sunset scene, one might position the sun low on the horizon, adjust its color temperature to a warm orange or red, and add a subtle haze effect to soften the light and create a dreamy atmosphere. For a nighttime scene, users would turn off the sun, utilize artificial lights such as streetlights and building lights, and perhaps add a moonlight effect for ambient illumination.
The key is to understand how light interacts with the environment and to use Lumion’s tools to accurately replicate these interactions. Consider the time of year; the angle of the sun will vary drastically between summer and winter solstices.
Atmospheric Effects
Atmospheric effects play a crucial role in enhancing the realism and mood of a rendering. Lumion 12 includes tools for adding fog, haze, rain, and snow, each influencing the overall ambiance in distinct ways. Fog, for example, can add depth and mystery to a scene, while haze can create a soft, diffused light. Rain and snow can significantly alter the lighting and add a sense of realism, reflecting light and creating wet surfaces.
The density and color of these effects can be adjusted to fine-tune the atmosphere. A dense fog will dramatically reduce visibility and create a moody atmosphere, while a light haze will subtly soften the scene without obscuring details. The interaction of these effects with light sources is particularly noteworthy; for instance, light beams can be seen more clearly through haze, creating a dramatic visual effect.
Lumion 12 Post-Processing Features
Lumion 12 offers a robust suite of post-processing tools that allow users to significantly enhance the final look and feel of their renderings. These tools go beyond simple adjustments, offering creative control to achieve a wide range of stylistic effects, from photorealistic to painterly. Mastering these features is key to producing truly stunning visualizations.Post-processing in Lumion 12 involves manipulating the rendered image to achieve desired artistic and technical results.
This includes adjusting color balance, contrast, sharpness, and adding effects like bloom and lens flares. The tools are intuitive and easy to use, allowing both beginners and experienced users to refine their renders effectively.
Color Grading
Color grading in Lumion 12 allows for precise adjustments to the overall color palette of a rendering. Users can adjust hue, saturation, and lightness (HSL) values to create specific moods and atmospheres. For example, shifting the overall hue towards warmer tones can create a cozy and inviting feel, while cooler tones can evoke a sense of serenity or coolness. One might use a slight teal and orange color grading scheme to mimic the style of a cinematic trailer, enhancing the drama and visual appeal.
Alternatively, a more subdued, naturalistic color grade can be used to achieve photorealistic results. The flexibility allows for a wide range of creative expression.
Tone Mapping
Tone mapping in Lumion 12 addresses the dynamic range of an image. High dynamic range (HDR) images, common in Lumion renders, contain a much wider range of brightness levels than can be displayed on a standard screen. Tone mapping algorithms compress this range, making the image viewable while retaining detail in both highlights and shadows. Different tone mapping presets offer distinct visual characteristics.
For instance, a “photorealistic” preset might prioritize preserving detail in the highlights and shadows, resulting in a natural look, whereas a “HDR” preset might emphasize the brighter areas, creating a more dramatic effect. Careful selection of the tone mapping method is crucial for the final image quality.
Bloom and Lens Effects
Lumion 12 includes tools to simulate bloom and lens effects, adding a layer of realism and visual interest. Bloom adds a soft glow around bright light sources, making them appear more natural and less harsh. This is particularly useful for emphasizing light sources such as the sun or spotlights. Lens effects, such as lens flares, can further enhance realism by simulating the imperfections of real camera lenses.
These effects, while subtle, can significantly improve the overall visual impact of a rendering, creating a more cinematic and engaging image. The intensity of these effects can be adjusted to suit the desired aesthetic, ranging from subtle enhancements to dramatic, almost stylized effects.
Sharpening and Noise Reduction
These tools are used to fine-tune the final image’s details and clarity. Sharpening enhances the edges and details within the image, making it appear crisper and more defined. However, over-sharpening can introduce artifacts, so careful adjustment is necessary. Noise reduction, conversely, smooths out any grain or artifacts present in the image, particularly useful when working with images rendered at lower resolutions or with certain rendering techniques.
Finding the balance between sharpness and noise reduction is key to a polished final product. The use of these tools is often dependent on the specific rendering and desired final look.
Lumion 12 Workflow and Best Practices
Optimizing your workflow in Lumion 12 is key to maximizing efficiency and producing high-quality renders. A well-structured project and smart asset management can significantly reduce rendering times and prevent frustrating errors. This section Artikels strategies for a smoother, more productive Lumion experience.
Project Organization, Lumion 12
Effective project organization is paramount for managing complex scenes. A cluttered scene not only slows down rendering but also makes it difficult to find and modify specific elements. Start by creating a clear folder structure for your project files, separating models, textures, and other assets into logical categories. Within Lumion, utilize layers effectively to group objects and control visibility.
This allows for easier selection, manipulation, and rendering of specific parts of your scene without impacting the rest. Consider using naming conventions for your models and materials to maintain consistency and ease of identification. For example, using a system like “Building_Exterior_Walls” instead of “Model1” significantly improves project organization and readability. Regularly save your project, and consider using version control if working on a large-scale project.
Asset Management
Managing assets efficiently streamlines your workflow and prevents resource conflicts. Begin by importing only the necessary assets into your Lumion project. Avoid importing large, unnecessary models or textures, as they increase file size and render times. Use Lumion’s built-in asset management features to organize your library, creating folders and subfolders to categorize your models, materials, and effects.
Regularly purge unused assets to keep your project lean and responsive. Consider using proxy models for high-resolution assets during the initial design phases, switching to the high-resolution versions only when final renders are needed. This significantly speeds up the editing process. Furthermore, maintaining a well-organized library of frequently used assets saves time and effort in the long run.
Troubleshooting Rendering Issues
Rendering issues can be frustrating, but understanding common problems and their solutions can significantly improve your workflow. One common issue is slow render times. This can be caused by several factors, including high-resolution models, complex scenes, or insufficient system resources. To address slow render times, optimize your scene by reducing polygon counts, using lower-resolution textures where appropriate, and ensuring your system meets Lumion’s minimum requirements.
Another common problem is rendering artifacts, such as flickering lights or strange shadows. These artifacts often result from incorrect material settings, lighting configurations, or conflicts between different assets. Carefully review your scene’s materials and lighting, and ensure there are no overlapping or conflicting objects. If issues persist, try restarting Lumion or your computer. In some cases, updating your graphics drivers can resolve rendering glitches.
If the problem persists after these steps, consulting Lumion’s online help resources or community forums can provide additional troubleshooting assistance.
Lumion 12 Integrations and Plugins
Lumion 12’s strength lies not only in its rendering capabilities but also in its ability to seamlessly integrate with other industry-standard software, streamlining the architectural visualization workflow. This integration, along with the use of plugins, significantly expands Lumion’s functionality, allowing for a more efficient and creative design process. Let’s explore the key integrations and how plugins enhance the user experience.
Lumion 12 boasts impressive interoperability with several popular design applications. This allows for a smooth transition of models and data between different software, preventing the need for extensive reformatting and saving considerable time.
Software Integrations
The ability to import and export models from various software is a critical aspect of Lumion’s design workflow. This reduces the need for manual model reconstruction and ensures consistency between design and visualization phases.
- SketchUp: A highly popular 3D modeling software, SketchUp integrates seamlessly with Lumion. Models can be directly imported, often retaining materials and textures. This streamlined process makes it a favorite choice for architects and designers.
- Revit: For BIM (Building Information Modeling) workflows, Revit’s integration with Lumion is crucial. Architects can directly import their Revit models, including building information, into Lumion for high-quality visualizations. This allows for accurate and detailed representations of complex projects.
- 3ds Max: A powerful 3D modeling and animation software, 3ds Max allows users to create highly detailed models for import into Lumion. The integration provides a flexible pipeline for creating photorealistic architectural renderings.
- ArchiCAD: Another BIM software, ArchiCAD offers a smooth workflow with Lumion, enabling the direct import of models and building data for realistic visualization.
Advantages and Limitations of Integrations
While the integrations offer significant benefits, it’s important to understand their limitations to manage expectations effectively.
- Advantages: Reduced model preparation time, improved workflow efficiency, enhanced collaboration between design teams using different software, and direct import of building information from BIM software.
- Limitations: Some complex models or materials might require optimization before importing to Lumion for optimal performance. There might be minor discrepancies in material representation between the source software and Lumion. Very large models could lead to longer import times.
Using Plugins to Extend Lumion 12 Functionality
Lumion’s plugin ecosystem allows users to expand its capabilities beyond its core features. While the number of officially supported plugins is relatively limited compared to some other software, those available provide valuable additions to the software’s functionality.
The process generally involves downloading the plugin from a trusted source, often the Lumion website or a reputable third-party developer, and then installing it within the Lumion application. The specific installation steps may vary depending on the plugin. Once installed, the plugin’s new features will be accessible within the Lumion interface, usually through new menus or tools.
For example, a plugin might add new materials, objects, or even entirely new rendering effects, enhancing the creative possibilities within Lumion. However, always ensure that plugins come from trusted sources to avoid potential malware or conflicts with Lumion’s core functionality. Always back up your project files before installing any plugins.
Lumion 12 Tutorials and Learning Resources

So, you’ve got Lumion 12 and you’re ready to unleash your inner architectural visualization wizard? Awesome! But even the most intuitive software benefits from a little guidance. This section dives into the wealth of online resources available to help you master Lumion 12, no matter your learning style. We’ll cover various resources, highlighting their strengths and how they can help you on your journey to creating stunning visualizations.
Reliable Online Resources for Learning Lumion 12
Finding the right tutorials and documentation can be a game-changer in your Lumion 12 learning experience. The following table categorizes several reliable online resources, offering a diverse range of learning styles. Remember, the best resource is the one that best suits your individual learning preferences.
| Resource Type | Resource Name | Description |
|---|---|---|
| Official Documentation | Lumion’s Official Website and Help Center | This is your first stop. The official website provides comprehensive documentation, including user manuals, release notes, and frequently asked questions (FAQs). Expect detailed explanations of features, step-by-step instructions, and troubleshooting tips directly from the source. The help center is organized logically, making it easy to find specific information. |
| Video Tutorials | YouTube Channels (e.g., The SketchUp Essentials, Arch Viz Guy) | Numerous YouTube channels offer a treasure trove of Lumion 12 tutorials. These videos often provide visual demonstrations, making complex concepts easier to grasp. Look for channels with high-quality production and clear explanations. Many cover specific techniques, such as creating realistic materials or mastering advanced lighting. The visual nature of these tutorials is ideal for visual learners. |
| Online Courses | Udemy, Skillshare, LinkedIn Learning | Platforms like Udemy, Skillshare, and LinkedIn Learning offer structured courses on Lumion 12. These courses often follow a curriculum, providing a more systematic approach to learning. They typically include video lectures, downloadable resources, and quizzes to test your understanding. These are great for learners who prefer a structured and guided learning path. |
| Community Forums | Lumion’s Official Forum, Reddit Communities | Engaging with the Lumion community can be incredibly valuable. Forums provide opportunities to ask questions, share your work, and learn from others’ experiences. You can find solutions to specific problems, get feedback on your projects, and discover new techniques. This is particularly helpful for problem-solving and collaborative learning. |
| Blog Posts and Articles | Various Architectural Visualization Blogs | Many blogs dedicated to architectural visualization offer articles and tutorials on Lumion 12. These resources often focus on specific aspects of the software or provide insights into best practices. They can supplement the information found in other resources, offering diverse perspectives and approaches. |
End of Discussion

So there you have it – a comprehensive look at Lumion 12. From its demanding system requirements to its powerful post-processing capabilities, Lumion 12 is a game-changer for anyone serious about architectural visualization or creating captivating 3D renders. Mastering this software opens a world of creative possibilities, allowing you to bring your visions to life with unprecedented detail and realism.
Go forth and create!
Popular Questions
What’s the biggest difference between Lumion 11 and Lumion 12?
While a full feature comparison is needed, major improvements in Lumion 12 often center around speed and ease of use for complex scenes and improved realism in lighting and materials.
Is Lumion 12 compatible with my older graphics card?
Check the official Lumion system requirements. Older cards
-might* work, but performance will likely be significantly hampered. A dedicated GPU is crucial.
How much RAM do I really need for Lumion 12?
The recommended RAM is a strong suggestion. Less RAM will lead to slowdowns and crashes, especially with large projects. More is always better.
Can I use Lumion 12 for landscape design?
Absolutely! Lumion 12 excels at landscape visualization, offering tools for creating realistic terrain, vegetation, and atmospheric effects.
Where can I find good Lumion 12 tutorials?
The official Lumion website, YouTube (search for “Lumion 12 tutorial”), and various online architectural design communities are great places to start.